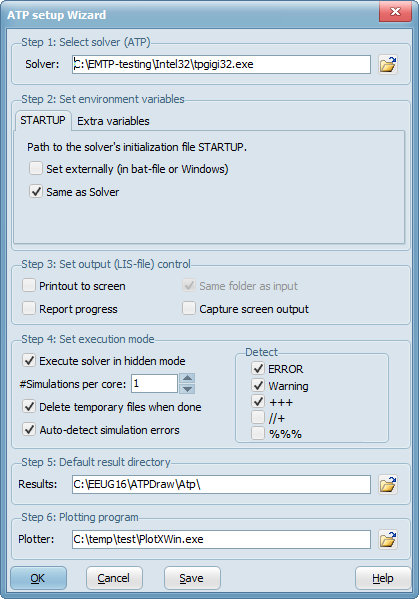
Setup the connection to the solver ATP (tpbig.exe/tpgiga.exe etc.) in two different ways.
ATP Setup Wizard (new in v6.1), shortcut: F10:
The Wizard contains six steps.
•Step 1: Select the solver (tpbig.exe). This becomes the new ATP_Command. Do not use third-party wrappers as RunATP.exe etc.
At this point there is a checkbox to specify if the ULM Foreign Model is available in the solver.
•Step 2: Set environment variables.
ATPDIR. Identify the path to STARTUP.
Same as Solver is the default choice, otherwise specified the desired path.
Set externally is used if the environment variable GNUDIR/ATPDIR is set in Windows (or a bat-file).
Extra variables. Can be a path to a user defined folder for instance HYSTDIR for the new hysteresis model by Zirka.
•Step 3: Select the LIS-file output mode (the written LIS-file can always be seen with F5).
If Printout to screen is checked, the 'both' option is used, otherwise 'disk'.
Same folder as input is the typical choice for the LIS-file destination.
With Report progress checked to progress bar in the status bar will be updated based on the simulation time progress from the lis-file. This slows down the simulation speed and should only be used for lengthy simulations.
Capture screen output will pipe the printout to an internal file even if ATP is executed in hidden mode. This can be helpful when debugging the setup.
•Step 4: Select execution mode and cleanup.
Execute Solver i hidden mode means silent ATP execution with no DOS window. This is useful and crucial for multiple runs for instance as focus is not taken away from ATPDraw.
#Simulations per core applies only to multiple runs using the Internal parser (ATP is executed in parallel threads). A low number will reduce the risk of CPU overflows.
Delete temporary files when done. This is the same as del dum*.bin and del tmp.* in the bat-file.
Auto-detect ATP errors. Set the default detection mode for reading the lis-file and displaying the error/warning messages.
•Step 5: Default Result Directory. This is where the results ATP, LIB, LIS, PL4 files go by default (unless ATP|Sub-process|Make ATP file is selected). The user must have writing privileges to this directory and it should preferably not contain space in its name. This path can also be set from the Toolbar, Sidebar or from Tools|Options/Files&Folders.
•Step 6: Plotting program. What program to start when F8 is pressed.

The ATP Connection Wizard
The selections in the ATP Setup Wizard are stored in the ini-file if the Save button is clicked or Tools|Options/Save options on exit is used.
Initial (or debugging) recommended settings:
1. Select tpbig.exe or tpgiga.exe.
2. ATPDIR; Unselect Set externally and select Same path as solver.
3. Unselect Printout to screen and select Same folder as input. Select Capture screen output.
4. Unselect Execute solver in hidden mode and select 1 simulations per core.
5. c:\eeug\atpdraw\atp\
6. c:\eeug\plotxy\plotxwin.exe
Final recommended settings:
1. Select tpbig.exe or tpgiga.exe.
2. ATPDIR; Unselect Set externally and select Same path as solver.
3. Unselect Printout to screen, unselect Capture screen output and select Same folder as input. Progress control can be set for extreme long lasting simulations, but not for multiple runs.
4. Select Execute solver in hidden mode and increase # Simulation per core to speed up multiple run cases.
5. c:\eeug\atpdraw\atp\
6. c:\eeug\plotxy\plotxwin.exe
Conservative (with edit bat-file skills) users:
1. Select runATP.bat or similar (depends of Watcom/GNU version. Edit the bat-file to get correct paths).
2. ATPDIR; Select Set externally (and specify it in the bat-file; ATPDIR or GNUDIR).
3. Select Printout to screen and select Same folder as input.
4. Unselect Execute solver in hidden mode and unselect Capture screen output. Do debugging by adding a 'pause' command to the bat-file.
5. c:\eeug\atpdraw\atp\
6. c:\eeug\plotxy\plot.bat
Classical setup:
Specify the ATP_Command under Tools|Options on the Preferences page.
This can typically be a bat-file distributed with ATP or ATPDraw. This file should contain the definition of the path to the ATP's initialization file STARTUP, execution of the solver with parameters, and possible cleanup afterwards. For the GNUATP-version of the solver the bat-file (runtp.bat or runATP_G.bat) can typically contain;
set GNUDIR=C:\EEUG15\GNUATP\
%GNUDIR%tpbig both %1 s -r
del dum*.bin
del *.tmp
pause
The command pause at the end will require a keystroke from the user to close the command window (which can be good to identify configuration messages).
GNUDIR is the path to the STARTUP file of ATP, typically in the same folder as the solver itself. This environment variables can also be set inside the Windows system settings and alternatively the variable ATPDIR can be used. If the GNUDIR/ATPDIR variable is set in Windows, the solver can also be executed directly by using the following ATP_Command=
'c:\eeug15\gnuatp\tpbig.exe disk $$ s -r'.
In order to set the connection to ATP up correctly the environment variable GNUDIR or ATPDIR must be set manually to the correct path.